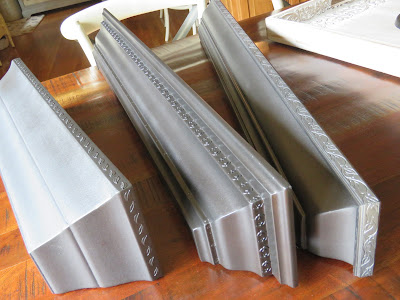
I've been in the midst of updating my studio now that I finally have REAL worktables (no more folding tables for this birdy) and they've been set, organized and in use. HOORAY! I decided some floating shelves would be just the thing to display and store my myriad of trays when they're not in use. And I had three shelves in my stash just waiting for a purpose! Scoooore!
A few weeks of pondering, piddling, and painting. . . They're beautiful, aren't they?
But they're not going to work the way I had envisioned. Sighhhh. . .
The idea wasn't a bad idea, it just wasn't right for the space. (Don't worry, I went with Plan B and I'm quite happy with it. The big ksyardbird Studio reveal is coming soon!). And, like what tends to typically happen, in true Robin-fashion, I got so engrossed in figuring out how to make my plain black shelves look metal, and excited about completing my Studio, I really don't have a lot of pics of the whole process. But that's never deterred me from sharing anyway!
The plain black shelves (except for the one with the oak-look trim you can glimpse on the far right in this photo) (oh! BTW - I think only one of these was actually black when purchased many moons ago) and project tools: nippers, measuring tape, tweezers and mega-glue being the most important.
I planned to add some sort of embellishments to create more of a pressed metal look on these wood (or fake wood, actually) shelves. I had an idea or two and just the right bits that I was pretty sure would work. Tiny metal one-sided charms that I snipped the top ring off (and saved to use later!). Clipping commenced, measuring ensued and gluing happened
That's a loooong shelf. . .
All glued, cured for a couple days and ready for paint. Excitement! Of course, I used spray paint. And I used lots of colors.
I started with a solid coat of black, with some swipes of matte gray and walnut. Then I topped it with light coat of bronze metallic and followed that with a deep steel metallic and a very lightly sparing spray of black topped with another very sparing coat of bronze. (trust me - there was lots of trial and error and even some sanding down involved before figuring out the color. . . ). Sometimes I let the coat of paint dry before applying the next coat (like the black base coat) and other times I just sprayed away - grabbing one can after another. I really do LOVE spray paint!
One shelf. . .
Then the other
How do you like my fancy-dancy spray tables. HA! One of these days. . .
Then to let them cure for a couple days.
Shortly after these pics were snapped, it started raining. . . days and days of clouds and rain and 90%+ humidity. These two shelves cured in the garage while the third shelf was sprayed (sometimes outside, sometimes in the garage - ssssh. . .our secret) in between rain showers and brought into the garage to cure.
After several days in the garage then another 24 hours resting in the studio, I buffed them with a clean rough (yes, rough like a bar rag) rag. It took that sort of 'rough' look and feel that metallic spray paint can leave sometimes and melded the colors. It didn't matter if I rubbed through a coat (which I really doubt I did) because of how it was all layered. Gave the shelves more of an authentic metal look. Or at least I think it did!
So, here's the first shelf all finished and looking for a wall . . .
If you look closely on the one bottom ridge, you'll see little 'rivets'. Nah - they're not rivets. They're the little circles I clipped off the bird charms. Cool, right?
The shelf with the wood trim (I added it to this originally glossy white shelf to match something that I can't even remember now. . . ) didn't require any additional details - though I did coat the top with extra layers of paint and treat it to extra buffing and a spritz of clear gloss. No reason. Just seemed like the right thing to do.
While the camera seems to interpret the color as more silver - it really is more of a black metal sort of bronzey-black. And so so pretty - in an industrial sort of way.
And then the smallest shelf of all - but big on personality like the other two. On this one, I glued tiny leaf embellishments in a flip-flop pattern (free-handed. . . no measuring here. Are you impressed? I am!)
These leaves started out as shiny silver - but not any more! I did opt to use my little buffing tool and my drill to give the leaves a good finish of their highly detailed little selves after they were painted.
So while these shelves aren't going where I originally intended. . . I already have plans for them to be used elsewhere in our house. I'm sure Hubster would LOVE them in the family room he claims as 'Man Land.' They *are* manly-metal after all. ;-)
P.S. Long handled tweezers were a MUST with the gluing part of this project.
P.P.S. And I only glued my fingers together once. Maybe twice. . .
Have an Un-shelved Kind of Day ~
Robin Z


No comments:
Post a Comment